This blog is the result of my son and his fiancée asking to see samples of various wood textures with a finish applied so that they could choose a particular wood for a matched pair of goblets. In your endeavor to find designs or ideas, remember that the next project you envision may be whimsical and it may also serve a useful purpose.
As I was mulling the various ways to display the multiple woods the thought of a Swagger Stick came to mind. A friend who is a coin collector had shown me a hand-made Swagger Stick made with various woods from the Philippines with a dated Philippine coin embedded in the knob. As that particular Swagger Stick was made during World War II, the tip was an expended pistol cartridge. Research on-line showed the typical Swagger Stick was approximately 18 inches (45.75 cm) long. Swagger Sticks were carried by commissioned British officers and also senior non-commissioned officers.
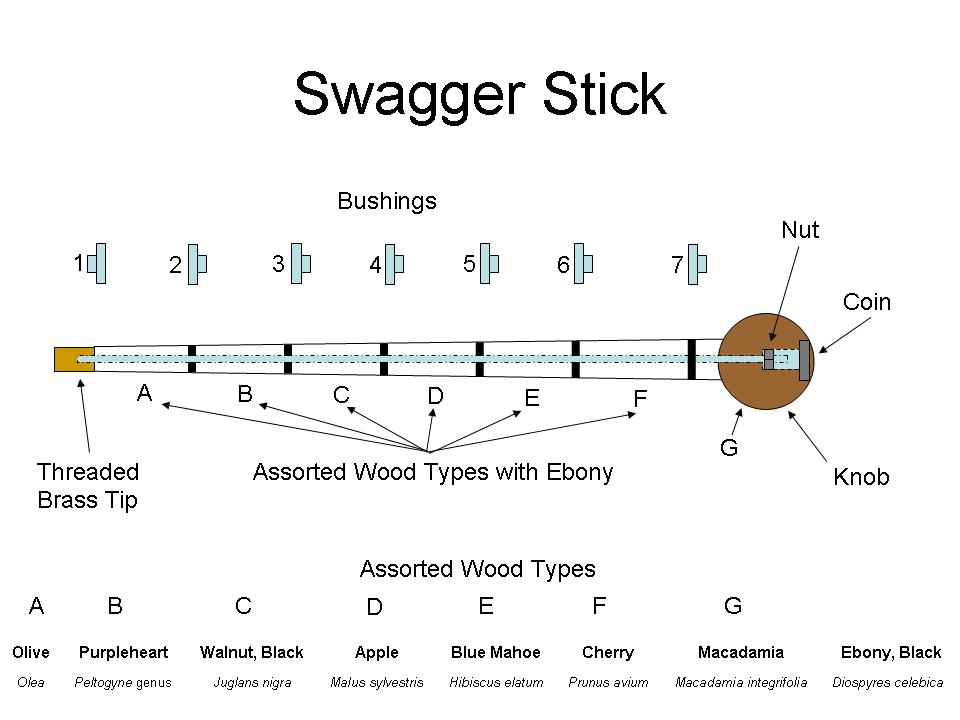
For my sample Swagger Stick I picked seven examples of woods that would make good goblets from my ‘stash’ of turning blanks and then found seven pen blanks of similar woods to use on the Swagger Stick. A thin slice of Ebony between each wood type contrasts very well with the chosen woods. The quantity of wood in the actual shaft being six, ultimately requiring each segment of wood to be about 2-3/8 inches (5.4 cm) long to allow for a 1/8 inch (31 mm) slice of ebony.
First I sliced 1/8 inch (31 mm) pieces of Ebony pen blank to go between the various wood types. I then trued up one end of each pen blank. Using two-part pen epoxy I then attached a slice of Ebony to each pen blank. Clamping each assembly ensured a tight glue joint for the each assembly. I then set the glued assemblies aside for overnight setting of the epoxy.
I decided on using a 10 X 32 threaded rod to provide additional strength and to minimize the weight of the display stick. For the tip on my Swagger Stick I decided to turn a brass block. Turning brass on a wood lathe is relatively easy but you must ensure the metal shavings do not get into the motor of your lathe. I drilled the center hole for the 10 X 32 threaded hole before I turned the tip. Using a 10 X 32 tap I threaded the tip so it could be threaded onto a segment of 10 X 32 threaded rod clamped in pin jaws in my mini chuck. By threading the brass onto the threaded rod it ensured the brass would remain true to the threaded rod.
Once the two-part epoxy had cured in the glued assemblies I found an issue that I had not planned on. A 3/16 inch brad point drill bit sized for the 10 X 32 threaded rod flexes too much to be able to drill the complete length of the 2-1/2 inch blanks. I solved this issue by drilling slightly more than half way into the blank and then reversing the blank and drilling slightly more than half way from the other end. Any mismatch would be in the center of the blank and the hole at either end would be perfectly centered. I could have increased the size of the threaded rod to something like ¼ X 20 to allow for using a larger drill bit but that would have also increased the overall weight of the Swagger Stick. This drawing illustrates that drilling from both ends will keep the holes at the ends of the blanks in the respective centers of the ends and any mismatch would be in the center of the blank. The mismatch is not as great as shown in drawing.

Once all of the segments had been drilled I cut a length of threaded rod about four inches (10.16 cm) long. To rough the segments to their approximate tapered diameter I made small wooden bushings similar to pen bushings. First I turned a spigot sized to fit into my live tailstock. Then figuring the end of the stick near the brass knob would be 0.5 inches (1.27 cm) while the end at the wooden knob would be 0.9 inches (2.286 cm) I drew a simple chart and calculated the diameter of seven bushings. Drilling a center hole in each bushing ensured they would line up when threaded onto the 4 inch piece of threaded rod. I marked each bushing with a sequential number for ease in identifying which bushing to use.
I put bushing number 1, a piece of Olive wood, and then bushing number 2 onto the 4 inch threaded rod. I clamped the end of the threaded rod at bushing number 1 in a chuck with pin jaws. Then I brought up my live tail stock to hold bushing number 2 in place. I then turned the first segment of my stick. I then removed bushing number 2, the Olive wood, and bushing number 1. The next segment would require using bushing number 2 to be next to the pin chuck and bushing number 3 to be at the live tail stock. I then proceeded to turn each segment individually with the respective bushings until all segments were to their approximate proper size. This is actually easier to do than try to write on paper.
The diameter of the wooden knob was the result of visiting a hiking store and just feeling the knobs on various walking sticks. The knob would be about 3 inches (7.62 cm) in diameter. Once I knew the relative diameter that felt right for my hand I basically copied that diameter at home. In the knob, I figured on an inlaid coin could serve as a focal point. A quarter showing the current year could identify when the Swagger Stick was made. There are Forsner bits that are sized to the U.S. quarter but I figured I would inlay a gold plated presidential dollar. While the coin sounds expensive, an uncirculated coin can be had for about $2.50 at a coin show. I used a 1 inch (2.54 cm) Forstner bit and found the gold clad dollar coin fit snugly. I turned the knob to its relative size and then drilled a 3/16 inch hole with the drill bit that I had drilled all of the segments with. The hole is centered on the end of the knob that will be attached to the shaft. I then parted the knob off of the turning blank. Reversing the knob I then drilled the 1 inch (2.54 cm) hole the depth of the coin. I then drilled a ¾ inch (1.905 cm) hole to allow for a nut.
Threading the segments onto a 20 inch (50.8 cm) threaded rod allowed me to place a nut inside the wooden knob and use two nuts at the opposite end as jamb nuts. I then proceeded to finish turn the shaft, sand through the various grits of sandpaper (remembering to sand with the grain between grits to remove sanding marks) and ultimately apply the finish. I used French polish for this project.
Removing the two jamb nuts and attaching the brass knob completed this phase of the project. I used a drop of thread sealant to ensure the brass knob would not loosen unexpectedly. The remaining task was to make a small display stand. This was as simple as a board with two uprights to hold the Swagger Stick. I did sand a dimple on each upright to keep the Swagger stick from rolling off of the stand.
2 part Pen Epoxy
1 inch Forstner bit
3/4 inch Machinist bit
Chuck with Pin Jaws
French Polish
